What is a “multi-participant” ledger?
Daml ledgers can have various topologies. For this blog post, we are interested in ledgers with a multi-participant topology. A participant is a node that serves the Ledger API to a set of system parties, and hence a multi-participant topology is a topology with multiple participant nodes. The different participants will typically serve different sets of a system’s parties. You can read more detail about Daml ledger topologies and participants in the documentation.
Why multi-participant ledgers?
Multi-participant ledgers are quite common, for example, Daml on Hyperledger Sawtooth and the Canton ledger interoperability protocol both use multi-participant topologies. The diagram below shows an example multi-participant topology on Canton:
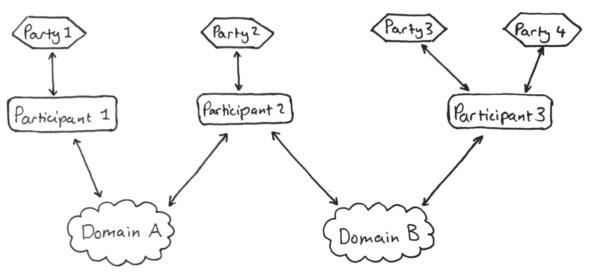
In this diagram, system parties connect to participant nodes that serve the ledger api. The participant nodes connect to domains. Each Canton domain is a Daml Ledger instance that facilitates Canton’s synchronization protocol between participants.
Different implementations vary in their reasons for using multiple participants, but in general there are several potential advantages to such a topology. Some of these advantages are:
- Privacy: Typically, participants only know about the portion of the ledger relevant to their parties. A party can prevent this data being stored by an untrusted entity by running their own participant node, or picking a trusted participant node.
- Scalability: Having multiple participants can improve the throughput of a ledger under certain workloads, as work can be shared between participants.
- Reducing trust assumptions: The participant(s) hosting a party act on behalf of a party; other participants don’t. Under some implementations, participants do not trust each other so a party only needs to trust its hosting participant.
Example of running “create daml app” on Canton
Running applications using multiple participants can add complexity, particularly during development when you may want to host multiple participants from the same machine. In the rest of this post I’ll describe how to run the create-daml-app example application on two participants simultaneously, using Canton as our example multi-participant ledger. Before trying this out, I recommend that you follow the Daml getting started guide.
For this tutorial we will use the following dependencies:
- Canton 0.18.1
- Daml 1.5.0
- The dependencies specified here
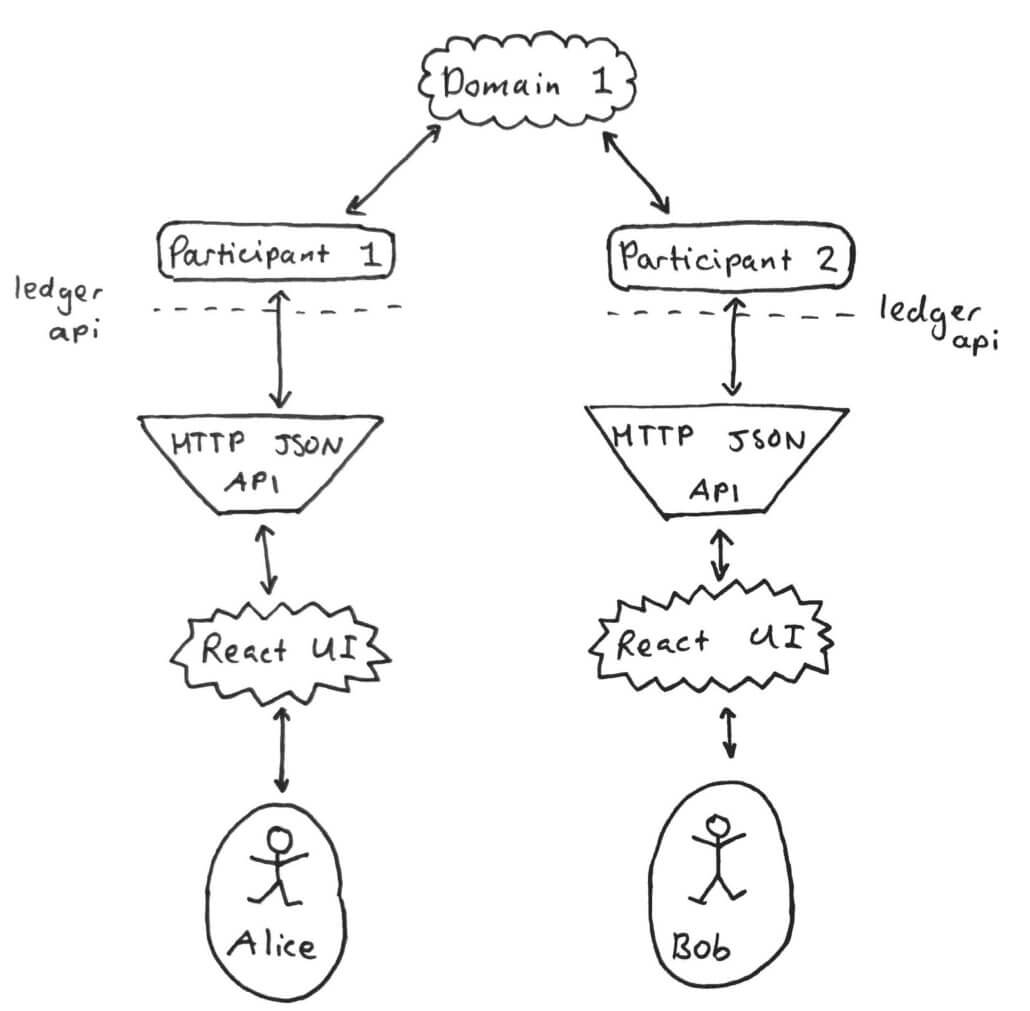
The following diagram shows the overall topology we’re going to set-up in the remainder of this post.
Start by installing Canton. Unpack the archive to a location of your choice, for example `~canton-cda`, and `cd` into the unpacked archive.
Next, fetch the `create-daml-app` example. Use the exact command given below.
Build the DAR and install the dependencies for the UI with the following set of commands:
Return to the directory where you unpacked Canton, and start Canton.
This will start two participant nodes: we are using a multi-participant topology. It will also allocate two parties. `Participant1` will host the party `Alice`, and `Participant2` will host Bob. Leave the Canton console running -- we’ll need it later.
We’ll now start two different instances of the UI that will run concurrently, one for `Alice` and one for `Bob` . To connect the UI to a participant’s Ledger API we need to use the HTTP JSON API, so we need an instance of this for each participant.
In a new terminal window, start the HTTP JSON API for Participant1:
And also start the HTTP JSON API for `Participant2` in another terminal window:
We can now start the two UI instances, again in two new windows. For `Participant1`:
And for `Participant2`:
This will open a UI talking to `Participant1` (`Alice`’s participant) on http://localhost:3000/ and a UI talking to `Participant2` on http://localhost:3001/. But unfortunately we can’t just log-in using the strings `“Alice”` or `“Bob”` because Canton uses a more complicated representation of party IDs. We can return to the Canton console to lookup Alice and Bob’s party IDs:
So, in this example, we can log-in as Alice with the ID `Alice::01691ae95af923195517af5de7cd551d8a52015943d2640b98290af5cb8c5d33fb`and as Bob with `Bob::01dede5ea97789e9965eb94532b12fe4b83cf06c5571c20787d794e936c0b2df0a` (Your IDs will differ).
Use these to log-in to the two UI instances. It should look something like this:
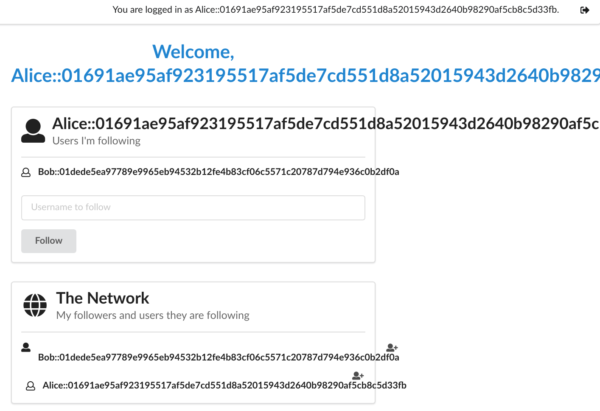
Admittedly the IDs are a bit long, but it’s otherwise fully functional . Alice and Bob should be able to follow each other: the different participants should be able to interact with each other using the Canton interoperability protocol. You can find a more detailed version of this tutorial in the Canton documentation.
Also, if you are interested in interoperability, Anthony Lusardi presented a Cross-Platform Interoperability DEMO on that at the Hyperledger Global Forum 2020 in Phoenix: